Disassembly
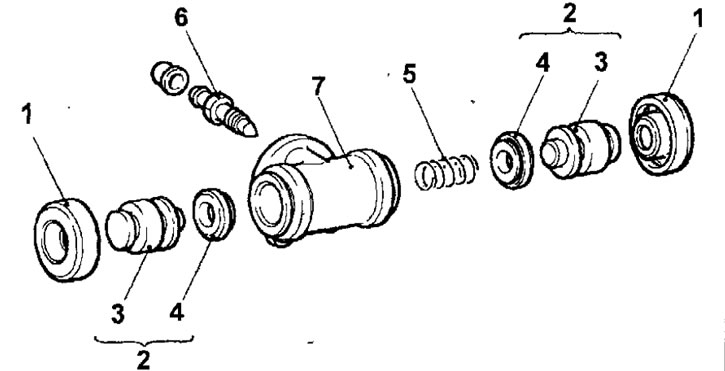
1. Remove the protective cover (pic. 15.51).

Pic. 15.51. Working brake cylinder: 1 - dust cover: 2 - piston assembly; 3 - piston; 4 - piston cuff; 5 - spring; 6 - bleed valve, 7 Nm; 7 - body of the working brake cylinder
2. Remove piston assemblies.
3. Remove cuffs from pistons.
4. Remove the spring.
5. Turn out the pumping union.
Examination
Check the walls of the working brake cylinder and piston for damage or rust. At detection of deviations from norm replace the working brake cylinder in gathering.
Installation
1. Installation is carried out in sequence. return to withdrawal, subject to the following.
2. Before assembly, wash the piston and cylinder with alcohol or with the brake fluid used.
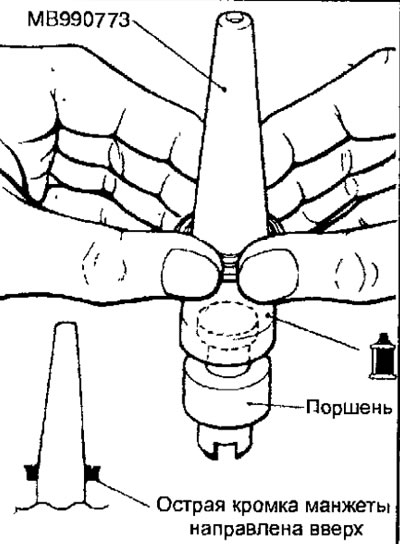
3. Grease with a brake liquid cuffs of the piston and a special mandrel.
Brake fluid: DOT3 or DOT4
4. Put the piston collar on a special mandrel so that the sharp edge is directed upwards, then, lowering it down along the mandrel, install it in the piston groove. To avoid twisting or misalignment of the piston collar during installation, lower it slowly and carefully, in one motion without stopping (pic. 15.52). The sharp edge of the piston collar must be at the top.

Pic. 15.52. Using a mandrel to install a cuff on the piston of a working brake cylinder
