Note. Figure 18.36*1 flange bolts are marked, and*2- bolts with washer.
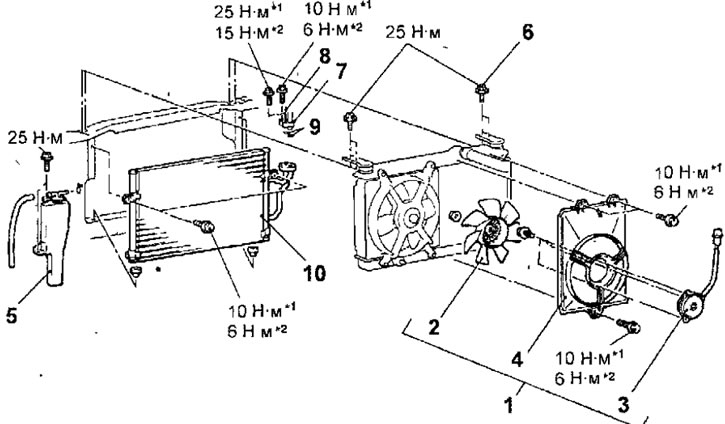
Pic. 18.36. Condenser and condenser fan: 1 - condenser fan assembly with casing; 2 - condenser fan; 3 - condenser fan motor; 4 - casing; 5 - expansion tank; 6 - bolt; 7 - fixing tube A; 8 - discharge hose; 9 - sealing ring; 10 - condenser
Removing
- Disconnect the wire from the negative battery terminal.
- Disconnect the connector, remove the bolts and remove the condenser fan assembly with casing.
- Loosen the nut and remove the fan impeller from the motor.
- Loosen the bolts and remove the condenser fan motor.
- Discharge the refrigerant from the air conditioning system.
- Remove the air filter.
- Drain the coolant from the engine cooling system.
- Turn out bolts, disconnect hoses and remove a broad tank.
- Remove the condenser top mounting bolts.
- Turn out bolts and disconnect from the condenser a tube A and a discharge hose.
- Tilt the radiator towards the engine, -then lift the condenser up and remove it from the car (pic. 18.37).
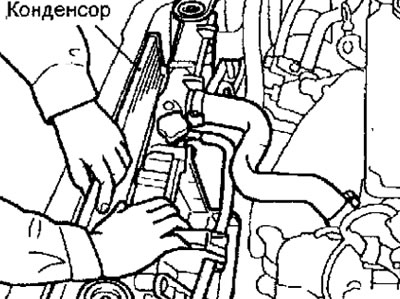
Pic. 18.37. Removing the condenser from the car
Examination
- With additional wires, apply voltage from the battery to the connector pins of the condenser fan motor (pic. 18.38). If the fan motor rotates and does not create extraneous noise, then it is working.
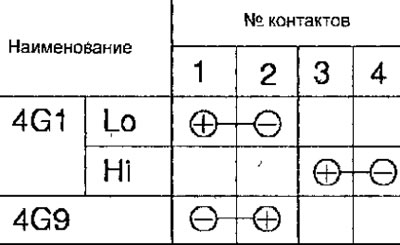
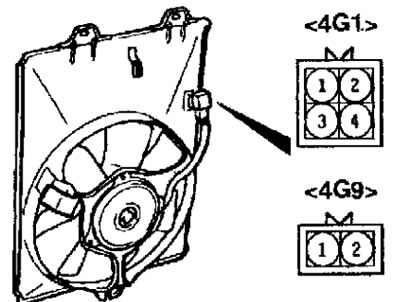
Pic. 18.38. Checking the Condenser Fan Motor
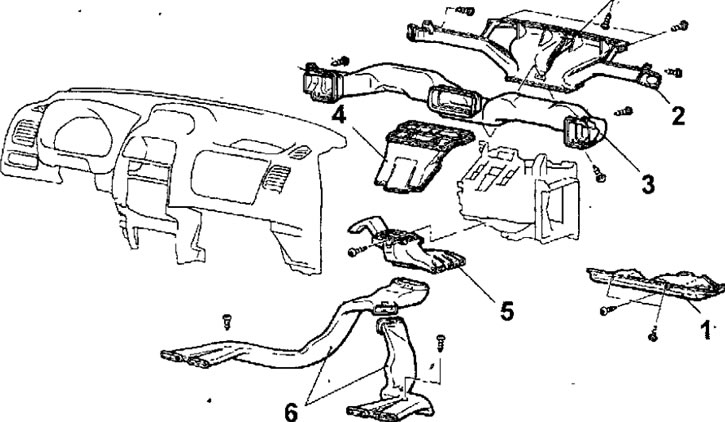
Pic. 18.39. Location of ventilation system ducts: 1 - bottom cover; 2 - air duct of the glass heater; 3 - distribution duct; 4 - central ventilation duct; 5 - lower air duct; 6 - air duct for supplying air to the legs of the rear passengers
Installation
- Installation is carried out in the reverse order of removal, taking into account the following.
- If a new condenser is to be installed, fill it with 15 ml of SUN PAG 56 compressor oil.
- Replace O-rings and lubricate them with SUN PAG 56 compressor oil (rice. 18.25).
- Charge the air conditioning system with refrigerant and check its operation.
