Note. Figure 18.21*1bolts and nuts with a flange are marked, and*2 - bolts and nuts with washers.
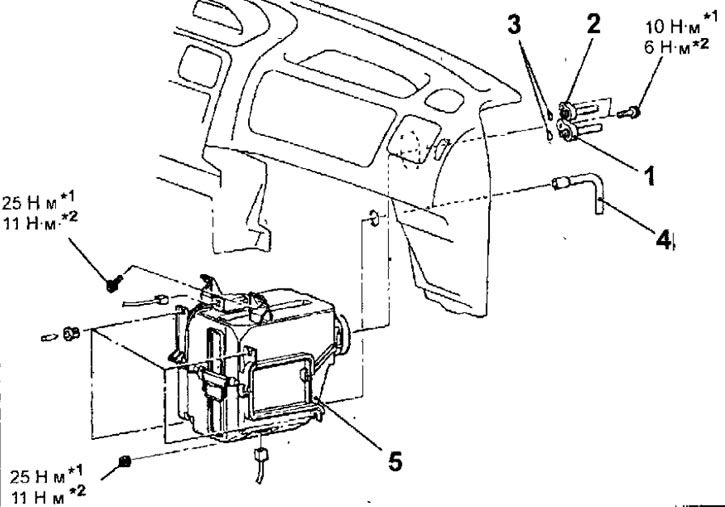
Pic. 18.21. Evaporator: 1 - suction hose; 2 - tube B for refrigerant; 3 - sealing ring; 4 - drainage hose; 5 - evaporator
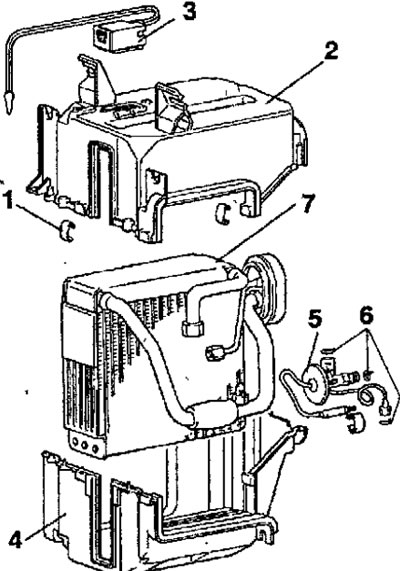
Pic. 18.22. Evaporator: 1 - spring clip; 2 - upper section of the evaporator body; 3 - compressor control unit; 4 - lower section of the evaporator body; 5 - expansion valve; 6 - sealing ring; 7 - evaporator
Removing
- Disconnect the wire from the negative battery terminal.
- Discharge the refrigerant from the air conditioning system.
- Remove the air filter.
- Remove the glove box.
- Remove the passenger side lower panel from the instrument panel.
- Disconnect the suction hose from the evaporator.
- Turn out bolts and disconnect from the evaporator a tube in for refrigerant. Close all open openings and pipes immediately to prevent moisture from the air from entering the air conditioning system.
- Disconnect the drain hose from the evaporator.
- Disconnect the connector, unscrew the nuts and remove the evaporator.
Disassembly
- Use a screwdriver to pry the clips holding the upper and lower sections of the evaporator body together (pic. 18.23).
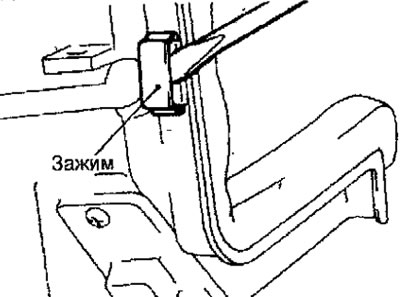
Pic. 18.23. Using a screwdriver to remove the spring clip
- Remove the compressor control unit.
- Remove expansion valve.
- Remove the evaporator from the bottom section of the evaporator housing.
Assembly
- The assembly of the evaporator is carried out in the reverse order of disassembly, while replacing the sealing rings and lubricating them with SUN PAG 56 compressor oil (pic. 18.24).
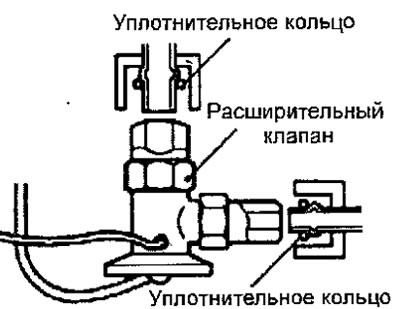
Pic. 18.24. Locations for O-rings
Installation
- Installation of the evaporator is carried out in the reverse order of removal, taking into account the following.
- When replacing the evaporator, add 60 ml of SUN PAG 56 compressor oil to the air conditioning system.
- Replace o-rings and lubricate them with compressor oil (fig.18.25).
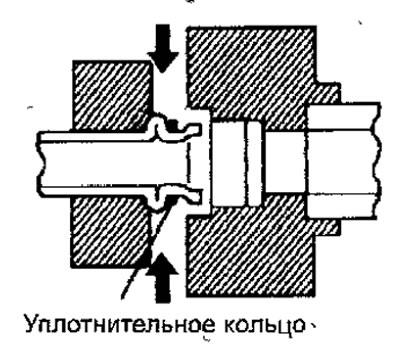
Pic. 18.25. O-ring installation
- Charge the air conditioning system with refrigerants and check its operation.
