Removing
To remove the rear suspension arms, perform the following steps in sequence.
1. Raise the rear of the vehicle and secure it to stands. Remove the relevant wheel and wheel hub.
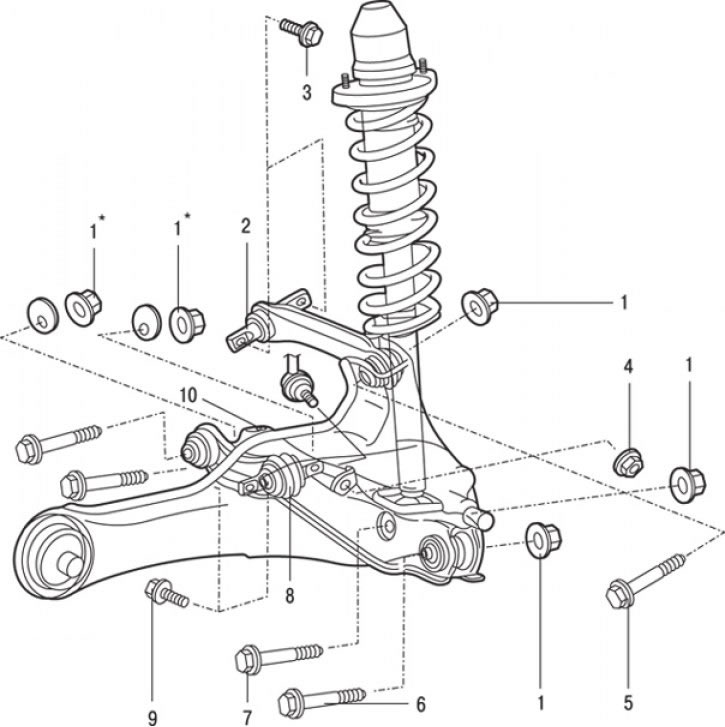
Note. familiar (*) the part numbers are marked, which must be pre-torqued, and then carried out the final tightening by lowering the unladen car on the wheels.
Correction lever

Pic. 16.7. Corrective, upper and lower rear suspension arms: 1* - nut (98 Nm); 2 – the top lever; 3 - bolt (34 Nm); 4 – a nut of fastening of a rack of the stabilizer of cross-section stability and the lower lever (cars with anti-roll bar) (49 Nm); 5 – a bolt of fastening of the top lever and the longitudinal lever; 6 – a bolt of fastening of the bottom and longitudinal levers; 7 – a bolt of fastening of the bottom lever and a back shock-absorber rack in gathering; 8 - corrective lever; 9 – a bolt of fastening of the correcting lever and the trailing lever 34 Nm; 10 - lower arm
1. Loosen and remove bolt 9 (pic. 16.7) connection of the corrective lever and the trailing arm.
2. Remove corrector lever 8.
Upper arm
1. After installing the jack under the lower suspension arm, you can remove the upper arm.
2. Loosen the nut and remove the bolt 5 (see fig. 16.7) connection of the upper arm and the trailing arm.
3. Turn away two bolts and remove the top lever 2.
Lower arm
1. Loosen and remove bolt 9 (see fig. 16.7) connection of the corrective lever and the trailing arm.
2. Turn away a nut 4 and disconnect a rack of the stabilizer of cross-section stability and the bottom lever (cars with anti-roll bar).
3. After installing the jack under the lower suspension arm, unscrew the fasteners.
4. Turn away and take a bolt 6 of connection of the bottom and longitudinal levers.
5. Turn away and take a bolt 7 of connection of the bottom lever and a back shock-absorber rack in gathering.

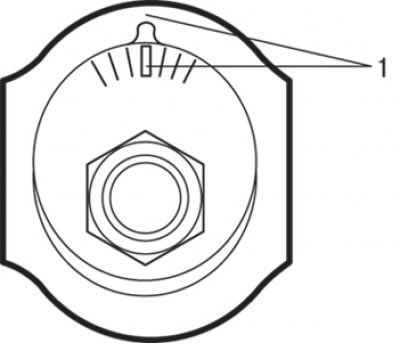
Pic. 16.8. Alignment marks (1) on the bolt for adjusting the toe or camber of the rear wheels
6. After alignment marks 1 (pic. 16.8) on the bolt for adjusting the convergence or camber of the rear wheels, remove the corrective and lower levers.
Examination
1. Check bushings for wear and damage.
2. Check the adjustment and lower arms for deformation or damage.
3. Check all bolts for wear and damage.
Installation
Installation is carried out in the reverse order of removal, taking into account the following.
Check rear wheel alignment.
