Removing
To remove the rear disc brake pads, perform the following steps in sequence.

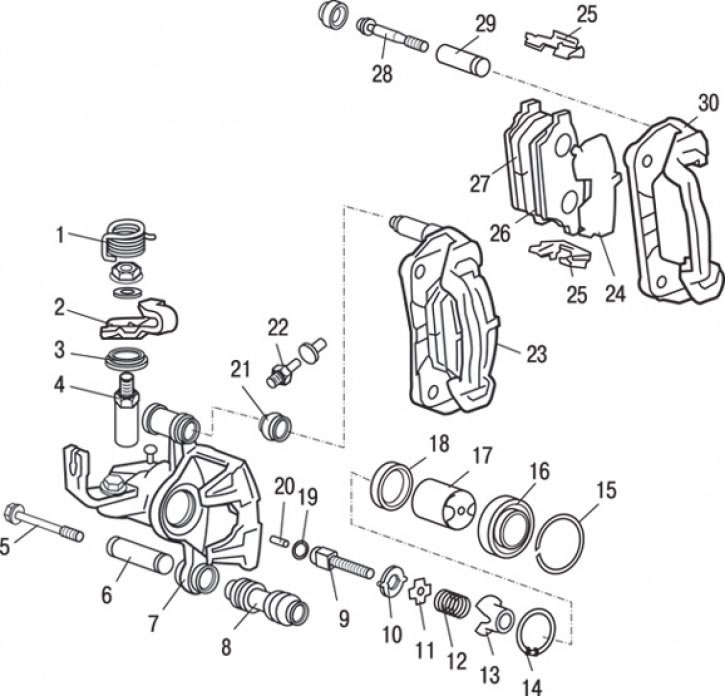
Pic. 14.38. Rear disc brake caliper: 1 - return spring; 2 – parking brake lever; 3 – anther of the lever; 4 - stem lever; 5 - lower guide pin (26 Nm); 6 - bushing of the lower guide pin; 7 - caliper body; 8 - anther of the lower guide pin; 9 - control rod; 10 - limiter; 11 - limiter plate; 12 - return spring; 13 - spring housing; 14 - retaining ring; 15 – piston anther ring; 16 - piston boot; 17 - piston assembly; 18 - piston sealing ring; 19 - ring gasket; 20 - connecting rod; 21 - anther of the upper guide pin; 22 - fitting for pumping (7.8 Nm); 23 - caliper bracket (complete with brake pads, pad guides and gasket); 24 - outer gasket; 25 - guide pads; 26 - brake shoe assembly; 27 - brake shoe with wear indicator as an assembly; 28 - upper guide pin (26 Nm); 29 - bushing of the upper guide pin; 30 - caliper bracket
1. Unscrew the lower guide pin 5 (see fig. 14.38).
2. Lift up the caliper bracket 23 (complete with brake pads, pad guides and gasket).
3. Remove outer gasket 24.
4. Remove the brake shoe 26 as an assembly.
5. Remove brake shoe 27 with wear indicator assembly.
Examination
Measure the thickness at the thinnest part of the brake pad lining. Replace the brake shoe assembly if the lining thickness is less than the 2.0 mm limit.
Attention! When reducing the thickness of the brake pad lining to the maximum allowable value, replace all the brake pads of all wheels at the same time.
Attention! If there is a significant difference in the thickness of the left and right brake pads, check the movement of the piston, as well as the lower and upper guide pins.
Installation
Installation is carried out in the reverse order of removal, taking into account the following.
1. Before installing the pads, using a special tool, press the piston into the caliper.
2. After installation of blocks it is necessary to press a brake pedal several times that blocks were established in working situation.
