Cruise Control Solenoid Leads

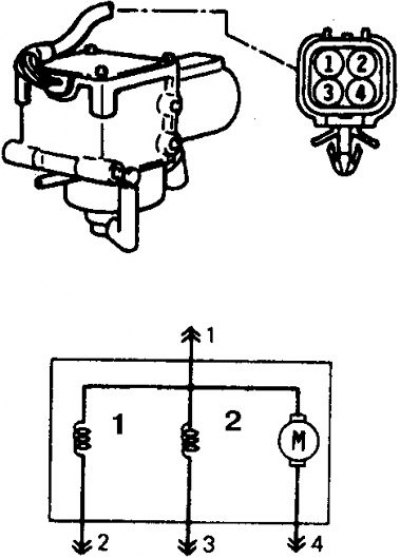
1. Control valve; 2. Bleed valve
Components of the cruise control system

1. Shield; 2. Accelerator cable nut B; 3. Accelerator cable nut A; 4. Rope; 5. connector; 6. Drive; 7. Accelerator switch; 8. Stop signal switch; 9. Clutch release sensor; 10. Retarder switch; 11. Speed sensor; 12. Cruise control switch; 13–15. Overlays of a doorway and a body; 16. Control unit
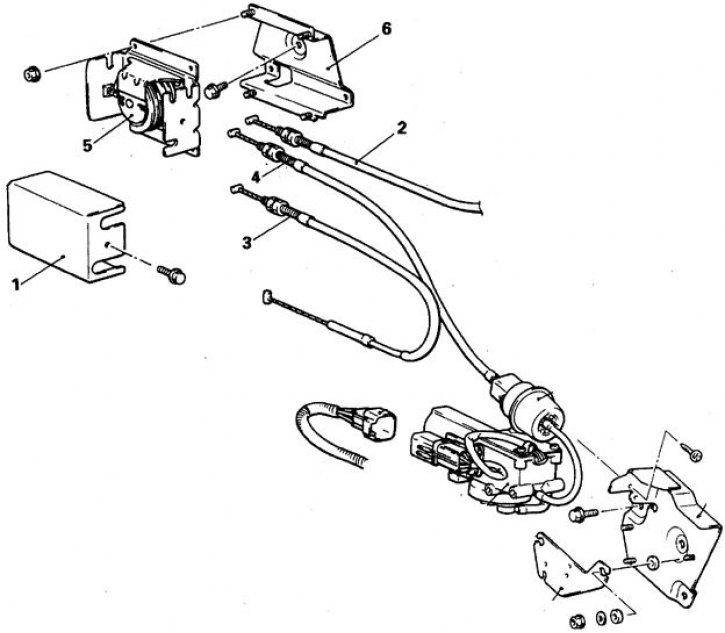
The nodes of the cruise control system of cars 1992-98

1. Shield; 2. Accelerator cable B; 3. Throttle cable; 4. Cable cruise control; 5. Backstage; 6. Bracket
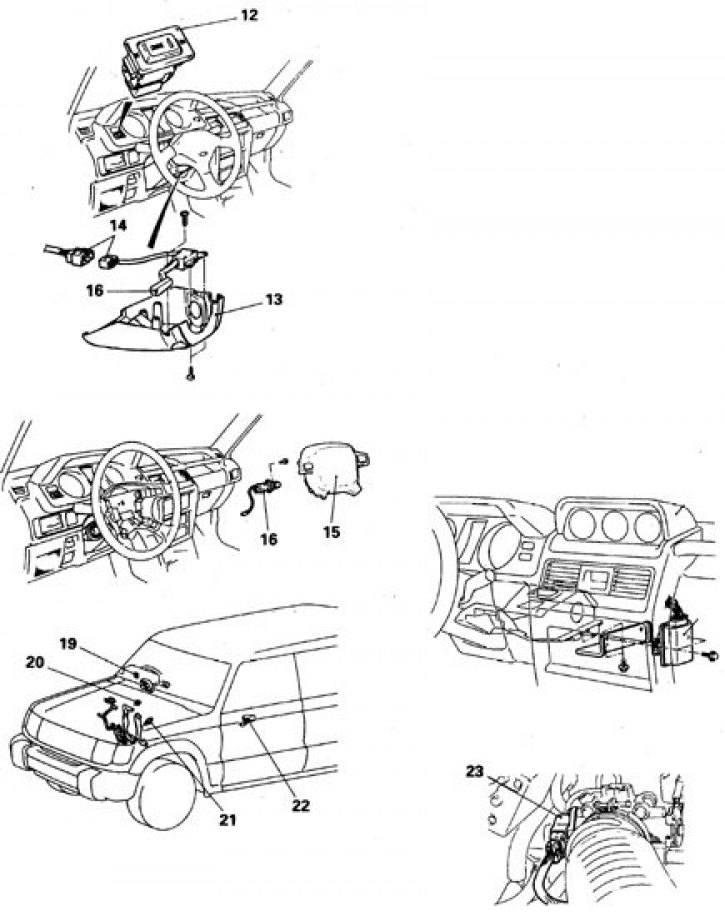
How to remove sensors, switches and cruise control control unit (1992-98)

12. Main switch; 13. Lower column pad; 14. Connectors; 15. Airbag module; 16. Control switch; 19. Speed sensor; 20. Stop signal switch; 21. Clutch release sensor; 22. Blocking switch automatic transmission; 23. Throttle angle sensor
Solenoid valve
Examination
1. Disconnect the connector from the vacuum pump.
2. Check the resistance between pairs of pins 1-2 and 1-3, which should be 60 ohms.
3. Check valve operation when battery is connected between terminal pairs 1-2 and 1-3.
4. Replace the valve if it does not work as described.
Drive unit
Examination
1. Disconnect the connector from the vacuum pump.
2. When a battery is connected between terminals 1-4, the drive should rotate.
3. Otherwise, replace the drive
Removal and installation
1. Disconnect the battery from the ground.
2. Remove the drive shield.
Cars 1988-91
3. Loosen the cable sheath nuts and disconnect the cables from the drive.
4. Disconnect the connector from the drive.
5. Turn away 3 nuts and remove a drive.
6. Disconnect wires from an accelerator, the switch of a signal of braking, the gauge of deenergizing of coupling and a retarder, remove switches.
7. Remove the instrument cluster (see fig. subsection 13.16), remove the speed sensor from the speedometer.
8. Remove the cruise control switch from the steering column.
9. Remove an overlay of an aperture of a forward door, an overlay of a threshold, a lateral casing and the control block.
10. Installation of the removed components of the system is carried out in the reverse order.
11. Tighten the cable nuts with a torque of 8–11 Nm.
Cars 1992-98
12. Disconnect all cables from the wings.
13. Turn away 4 nuts and remove a scene.
14. Turn away a bolt and remove an arm.
15. Disconnect the connector and hose from the vacuum pump and remove the pump.
16. Turn away 3 nuts and remove an arm of the pump.
17. Remove the drive.
18. Installation of the removed components of the system is carried out in the reverse order.
19. Adjust cables by doing the following.
Accelerator cable
20. Holding link C and resting against the limiter, tighten the cable sheath nut so that the free play of the cable is 2–3 mm, tighten the lock nut.
Throttle cable
21. Holding link B and resting against link C, tighten the cable sheath nut with the bolt released so that the free play of the cable is 1–2 mm, tighten the lock nut.
Cruise control cable
22. While holding link A and resting against link B, tighten the cable sheath nut so that the free play of the cable is 1–2 mm, tighten the lock nut.
