Salon panels (1992-98)

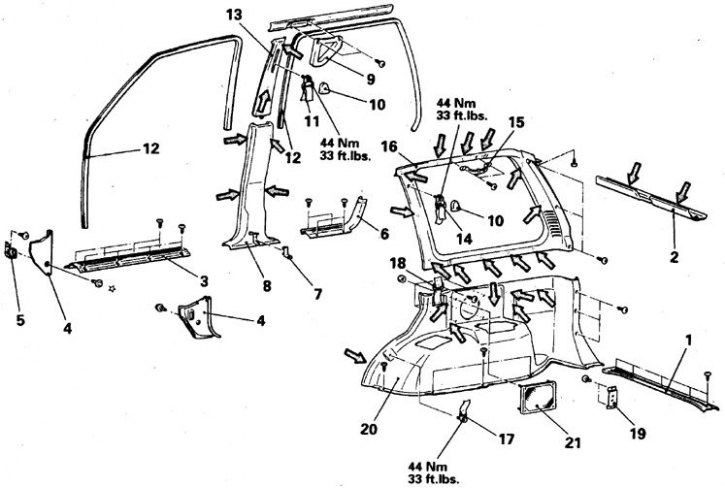
1. Rear transverse lining; 2. Rear overlay upholstery headlining; 3. Front nut pad; 4. Right side panel; 5. Bracket; 6. Rear nut pad; 7, 10. Belt attachment covers; 8. Bottom pad; 9. Handle; 11. Belt guide; 12. Seal; 13. Upper lining of the middle rack; 14. Belt guide; 15. Handle; 16. Window overlay; 17. Anchor plate rear belt; 18. Facing the rear belt; 19. Arm of a lamp of illumination of a back compartment; 20. Mudguard overlay; 21. Facing speaker; (1) – latch installation direction
Interior panels 2-door body (1983-91)

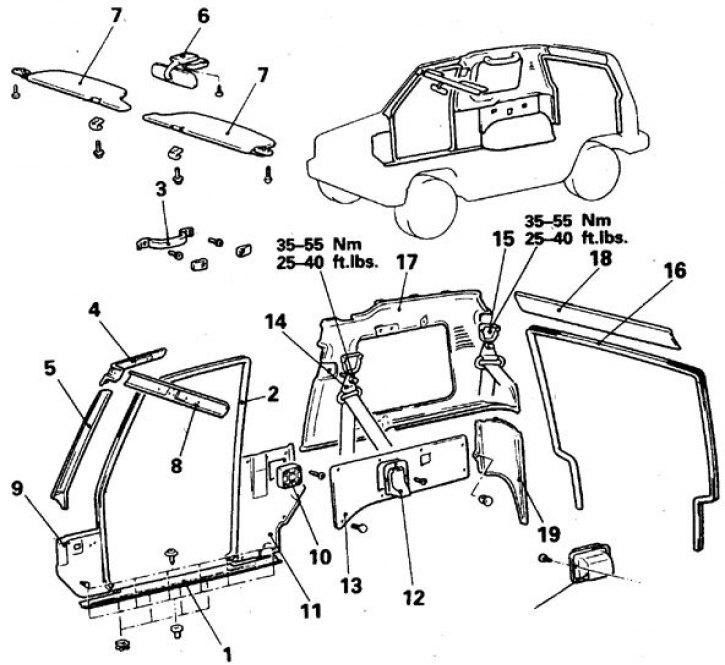
1. Front nut pad; 2, 16. Edging of the doorway; 3. Handle; 4, 8. Front overlay upholstery headlining; 5. Overlay of a forward rack; 6. Mirror; 7. Sun visor; 9. Right side panel; 10. Speaker; 11. Overlay of an average rack; 12. Seat belt tensioner cover; 13. Rear facing panel; 14. Front strap anchor plate; 15. Anchor plate rear belt; 17. Window trim; 18. Rear overlay upholstery headlining; 19. Lower lining of the rear pillar
Interior panels 4-door body (1983-91)

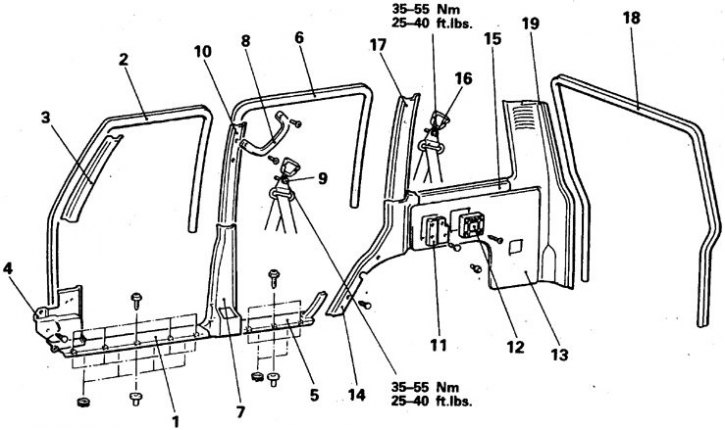
1, 5. Nut pads; 2, 6, 18. Doorway trim (back cover opening); 3. Overlay of a forward rack; 4. Right side panel; 7, 10. Linings of an average rack; 8. Handle; 9, 16. Belt fastening bolt; 11. Seat belt tensioner cover; 12. Speaker; 13, 14, 15. Rear side trim panels; 17. Overlay of a rack of the right sidewall; 19. Rear pillar pad
Panels of salon of a 4-door body with the hatch (1983-91)

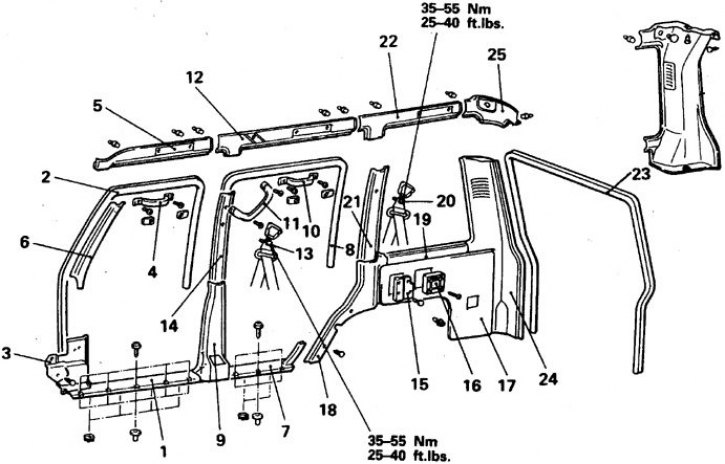
1, 7. Nut pads; 2, 8, 23. Doorway trim (back cover opening); 3. Sidebar; 4, 10, 11. Handle; 5, 12, 22. Overlay upholstery headlining; 6. Overlay of a forward rack; 9, 14. Linings of an average rack; 13, 20. Belt fastening bolt; 15. Seat belt tensioner cover; 16. Speaker; 17, 19, 24. Rear side trim panels; 21. Overlay of a rack of a back sidewall
Removal and installation
These panels are fastened with screws or special latches. Follow the steps below to remove latches.
1. Use a Phillips screwdriver to push in the center latch shaft about 2 mm (no more!).
2. Remove the latch by pulling it towards you.
3. When removing, first remove all panels whose edges cover the desired panel, then remove the panel itself.
4. When installing the latch, push the rod in until it is flush with the seal.
