Evaluation of the condition of the cylinder block

Visually inspect the cylinder block for gasket residue or other foreign matter, damage, rust or corrosion. If defects are found, repair them or replace the cylinder block.
Check the cylinder block with a liquid solution to determine the presence of cracks. If defects are obvious, then replace or repair the block of cylinders.
Attention! On models with manual transmission, do not loosen the mounting bolts «A» flywheel shown in the figure, as removing them will upset the balance of the flywheel, resulting in various malfunctions and damage to the flywheel.
Checking the warping of the mating plane of the cylinder block
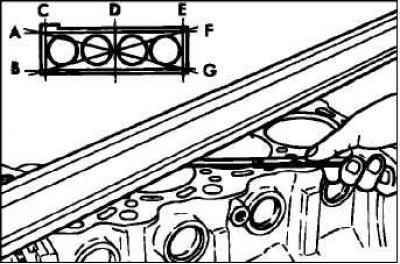
Using a straightedge and a feeler gauge, check the degree of warping of the cylinder block running surfaces in the directions shown in the figure. The surface of the cylinder block must be free of foreign particles.
- Standard value: 0.05 mm or less.
- Limit value: 0.1 mm.
If warping is significant, correct the defect to an acceptable value or replace the cylinder block. Maximum grinding depth: 0.20 mm.
Attention! The total thickness of the removed metal from the cylinder head and cylinder block must not exceed 0.2 mm in total.
Block height (new)
- 4G63–7 engine: 290 mm.
- 4G64 engine: 290 mm.
- 4G69 engine: 284 mm.
Cylinder mirror check
Check the cylinder mirror for scratches and signs of sticking (badass). If defects are noticeable, bore to the repair size or replace the cylinder block.
Piston clearance check (with connecting rod assembly) and cylinder

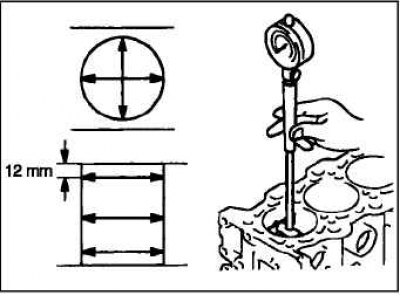
Using a bore gauge, measure the cylinder diameter and taper of the cylinder. If there is noticeable wear, bore the cylinder to the repair size, replace the piston and piston rings as a set.
The standard value of the internal diameter of the engine cylinder
- 4G63-7: 85.00-85.03 mm.
- 4G64: 86.50-86.53 mm.
- 4G69: 87.00-87.03 mm.
- Maximum allowable taper (cylindricity): 0.01 mm.
Cylinder boring

Rebore all four cylinders to the same oversize.
Do not bore only one cylinder.
According to the largest diameter of the cylinder of the engine being repaired, obtained as a result of measurements, determine the number of the repair size of the pistons.
The piston oversize number is stamped on the piston crown.
Repair dimensions of the piston and corresponding piston rings
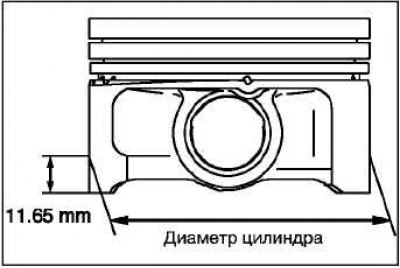
Measure the outside diameter of the piston to be used at the location shown in the figure.
Based on the measured piston outer diameter, calculate the cylinder bore diameter using the following formula: cylinder bore diameter = piston outer diameter + (gap between piston and cylinder) - 0.02 mm (honing allowance).
Bore all cylinders to the calculated diameter.
Engine 4G63-7

Engine 4G64

Engine 4G69

Attention! To prevent temperature deformations during boring, bore the cylinders in the following sequence: No. 2, No. 4, No. 1, No. 3.
Honed cylinders to final finish size (piston outer diameter + clearance between piston and cylinder).
Attention! To prevent temperature deformations during boring, bore the cylinders in the following sequence: No. 2, No. 4, No. 1, No. 3.
Check clearance between piston and cylinder.
Clearance between piston and cylinder: 0.02–0.04 mm.
