Troubleshooting for Radio Interference
Note: To reduce the effect of interference, tune into a station with a strong radio signal or adjust the sound quality (turn down the treble).
Interference when starting the engine
1. If during radio reception in the AM / FM bands (UKW/MW/LW) interference occurs (clicks, crackling, crunching and buzzing), which may be related to the operation of the ignition system.
A) Check if the click frequency increases and the sound volume decreases as the engine speed increases.
b) Check that the interference disappears when the ignition key is turned to the "ACC".
V) If at least one of the above conditions is met, then the spark plugs or the engine are the cause of the interference. Check interference suppression device - wire "masses".
2. If there is interference from other electrical components, it may be due to wear of the electrical components. Repair or replace the relevant electrical component.
3. If there is interference from static electricity (crackling, rustling, etc.).
A) Check that the interference disappears after the vehicle comes to a complete stop. In this case, the cause of interference is the contact of the wiring elements of the metal parts of the body. Eliminate contact between parts and wiring, install parts and wiring in the correct position.
b) Check that various interferences occur depending on the position of the car body parts. In this case, interference is caused by disconnection from the body of the hood, bumpers, exhaust pipes and muffler, suspension, etc. Securely tighten all body bolts, as a common cause of interference is the lack of reliable contact with "weight".
Constant background noise
1. If there are obstacles while driving:
- A) Check that the whip antenna is fully extended.
- b) Check that the wiring harnesses are routed correctly or the noise disappears when the wiring harness is moved away from the radio bracket (if the harness was not in place).
2. If there is interference on a stopped vehicle:
- A) Check the connection of the radio with "weight", connecting the radio connectors and connecting the antenna input pin.
- b) Check the serviceability of the antenna, the correctness of its installation and the area of contact of the wire with "weight".
3. If the radio is in good condition, then the noise and interference that occur during radio reception can be caused by the following reasons.
- A) Road conditions while driving.
- b) The relief of the surrounding area.
- V) Surrounding buildings and structures, g) Radio signal status.
- d) Times of Day.
Note:
- - The FM band is affected by the running engine, power wires, lighting devices to a much lesser extent than the AM band.
- However, due to the very high frequency of radio waves in the FM band, radio transmissions in this band are greatly affected by terrain and buildings. This influence is manifested in the distortion of the radio signal and the violation of the normal conditions for receiving radio stations (for example, buzzing, intermittent and constant, associated with the reflection of the radio signal from large obstacles).
- - Interference (hiss, whistle) occurring in areas of uncertain reception of radio signals, for example, in mountainous areas, are not signs of a malfunction of the radio.
Location of interference suppression devices
Attention:
- - Never connect a high voltage wire to the noise filter as this will damage it.
- - Check for an external source of interference. Be sure to perform this check so that a troubleshooting error does not occur.
- - Anti-interference should be carried out sequentially, step by step, by eliminating powerful sources of interference.
Connecting wire to "weight".
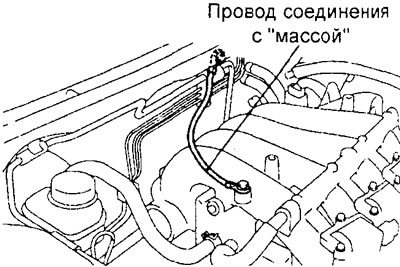
Sedan models with 4G15 engine.

Sedan models with 4G93 engine.
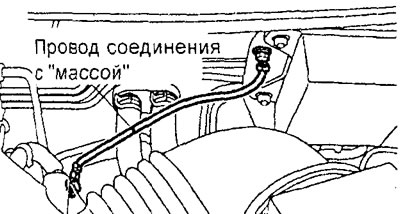
Universal models.
Removal and installation of the radio
- Parts are removed in the order of the numbers shown in the figure "Removing the radio".
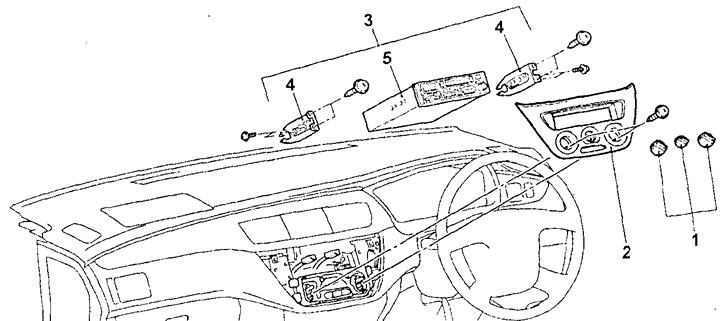
Removing the radio (models without MMCS). 1 - handles of air conditioning control switches, assembly; 2 - heater and air conditioner control panel assembly; 3 - radio assembly; 4 - radio mount bracket; 5 - radio.
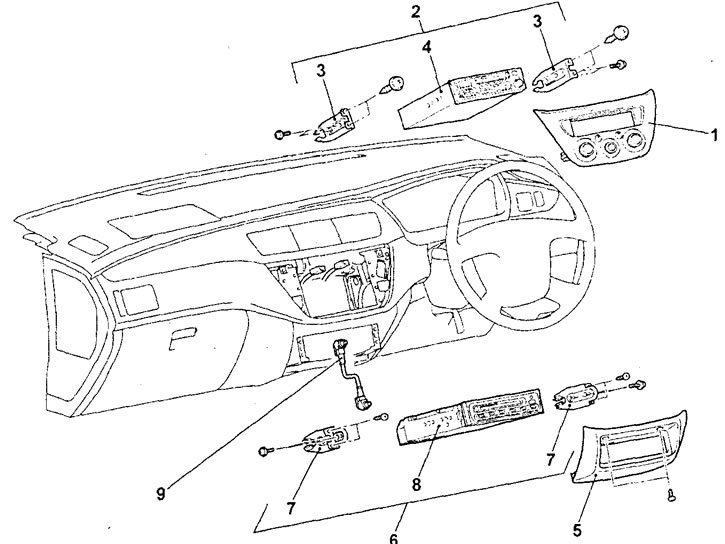
Removing the radio (MMCS models without DVD player). 1 - heater and air conditioner control panel assembly; 2 - radio assembly; 3 - radio mount bracket; 4 - radio; 5 - the lower part of the central trim of the instrument panel. 6 - CD changer assembly; 7 - brackets for fastening the CD-changer; 8 - CD changer; 9 - DIN cable.
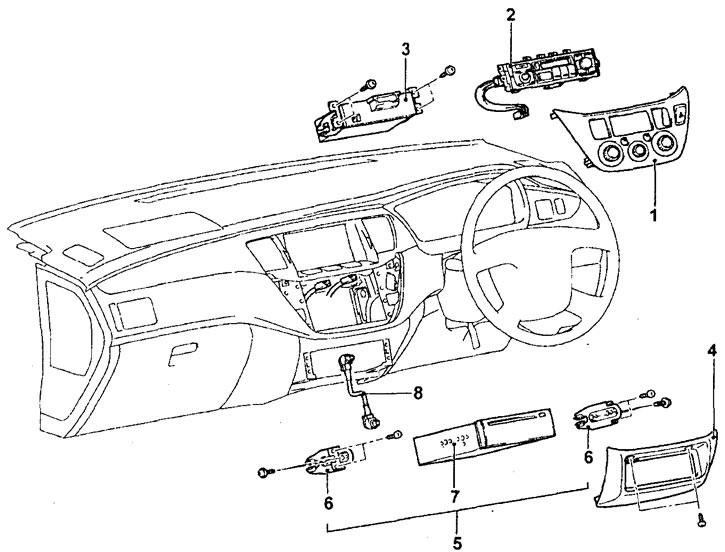
Removing the radio (MMCS models with DVD player). 1 - heater and air conditioner control panel assembly; 2 - MMCS system control panel; 3 - audio system unit; 4 - the lower part of the central trim of the instrument panel; 5 - DVD player assembly; 6 - DVD player mounting brackets; 7 - DVD player; 8 - DIN standard cable.
− Installation of parts is carried out in the reverse order of removal.
Removing and installing speakers
- Parts are removed in the order of the numbers shown in the figure "Removing the speakers".
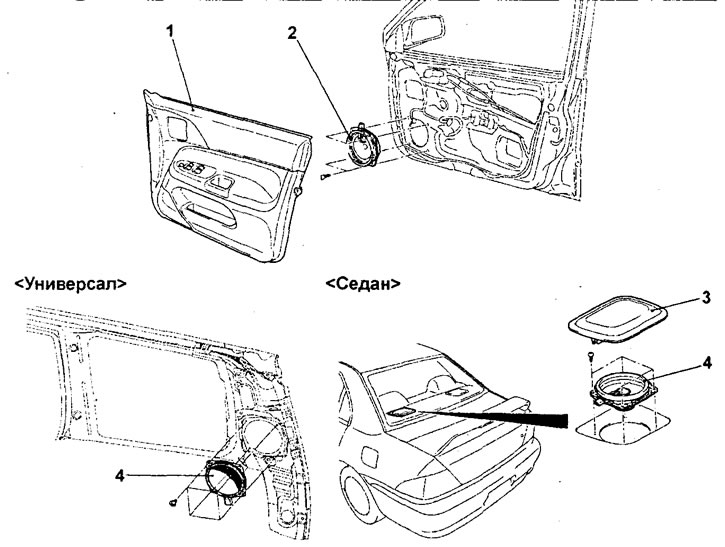
Removing speakers. 1 - side door trim; 2 - front speaker (for station wagon models, remove the C-pillar trim); 3 - overlay of rear speakers; 4 - rear speakers.
− Installation of parts is carried out in the reverse order of removal.
Removal and installation of the antenna on the front pillar
- Parts are removed in the order of the numbers shown in the figure "Removing the antenna on the front pillar".
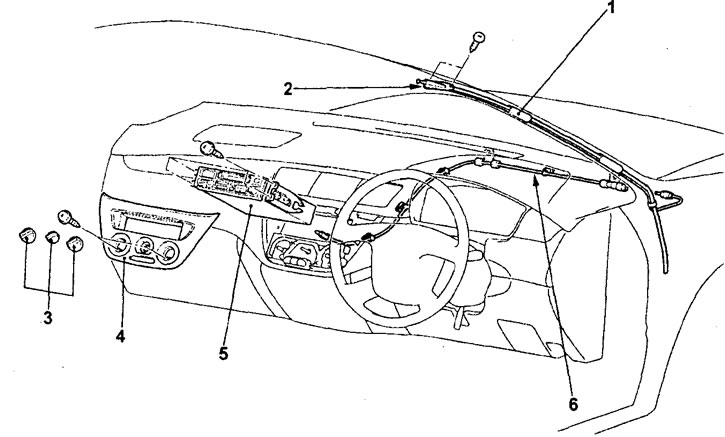
Removing the antenna on the front pillar. 1 - antenna on the front pillar assembly; 2 - antenna base; 3 - handles of the air conditioning control switches as an assembly; 4 - heater and air conditioner control panel; 5 - radio (remove the side cover of the instrument panel; remove the instrument panel); 6 - antenna feeder cable.
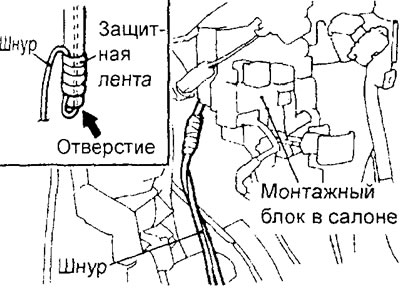
− When removing parts, pay attention to the removal of the whip antenna with cable assembly (facilitating subsequent pulling of the antenna cable).
A) Tie a suitable cord to the antenna feed cable.
b) Pull out the feed cable until the end of the antenna tube is visible.
V) Secure the other end of the cord with tape at the bottom end of the tube so you don't accidentally pull it out.
G) Extend the antenna gradually.
− Installation of parts is carried out in the reverse order of removal.
Removing and installing the antenna on the glass (sedan)
− Before starting to remove parts, carry out the following operations:
- A) Remove the instrument panel.
- 6) Remove the A-pillar trim, rear body side upper trim, B-pillar lower trim, and B-pillar upper trim.
- V) Remove the auxiliary handle.
- G) Remove the front and rear interior lights.
- d) Remove the ceiling trim.
- Parts are removed in the order of the numbers shown in the figure "Removing the glass antenna".
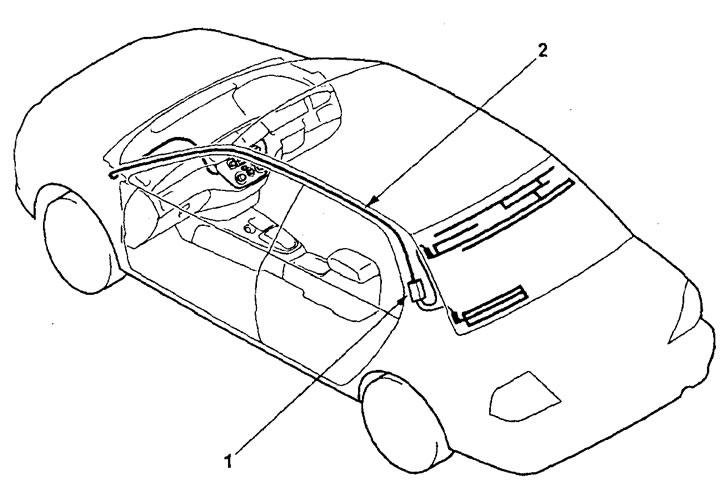
Removing the antenna on the glass. 1 - antenna amplifier on the rear window, 2 - antenna feed cable.
− Installation of parts is carried out in the reverse order of removal.
− After completing the installation of the parts, perform the following operations:
- A) Install ceiling trim.
- b) Install the front and rear interior lights.
- V) Install the auxiliary handle,
- G) Install the A-pillar trim, C-pillar upper trim, B-pillar lower trim, and B-pillar upper trim.
- d) Install the instrument panel.
Removing and installing roof antenna
− Before starting to remove parts, carry out the following operations:
- A) Remove the trim of the front pillar, the upper trim of the rear side of the body (sedan) or luggage compartment trim (station wagon), B-pillar lower trim and B-pillar upper trim.
- b) Remove the auxiliary handle.
- V) Remove the front and rear interior lights.
- G) Remove the ceiling trim.
- Parts are removed in the order of the numbers shown in the figure "Removing the roof antenna".
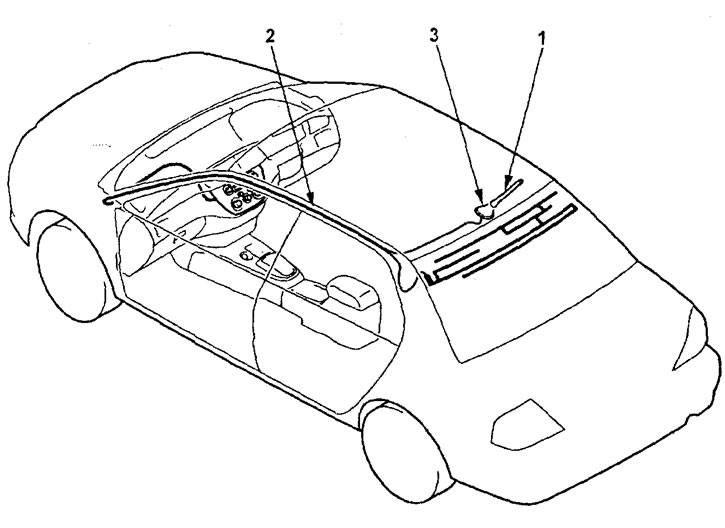
Removing the roof antenna (sedan). 1 - roof antenna, 2 - antenna base (remove the instrument panel), 3 - antenna feeder cable.
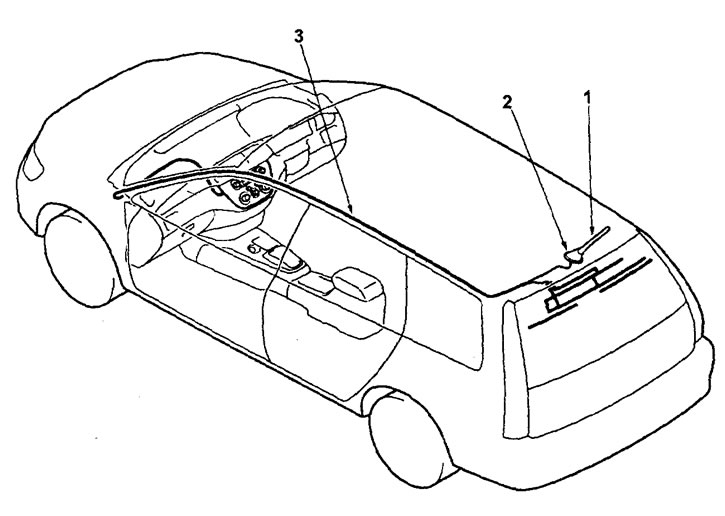
Removing the roof antenna (station wagon). 1 - antenna on the roof; 2 - antenna base (remove the instrument panel); 3 - antenna feeder cable.
− Installation of parts is carried out in the reverse order of removal.
− After completing the installation of the parts, perform the following operations:
- A) Install ceiling trim.
- b) Install the front and rear interior lights.
- V) Install the auxiliary handle.
- G) Install A-pillar Trim, Rear Body Side Upper Trim (sedan) or luggage compartment trim (station wagon), B-pillar lower trim and B-pillar upper trim.
