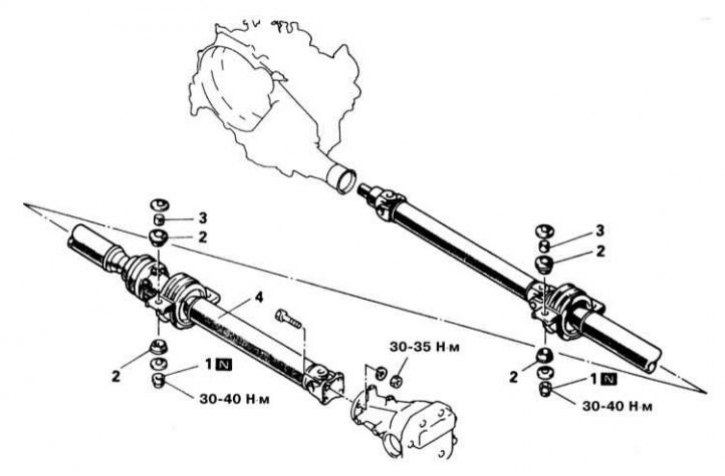
The design of the cardan shaft all-wheel drive models
1 - Self-locking nut; 2 - Rubber cushion; 3 - Remote sleeve; 4 - Cardan shaft; N - Replace
Removing
1. Disconnect the negative cable from the battery.
If the stereo system installed in the car is equipped with a security code, before disconnecting the battery, make sure that you have the correct combination to activate the audio system!
2. Jack up the car and put it on stands.
3. The crankshaft consists of three sections: front, rear and center. Loosen the center support bearing nuts and carefully remove the rubber pads underneath.
Note. In addition to rubber pads, the bearing fastener also uses a number of spacer bushings, the number and size of which may vary - try to remember the installation position of each of the fastener elements.

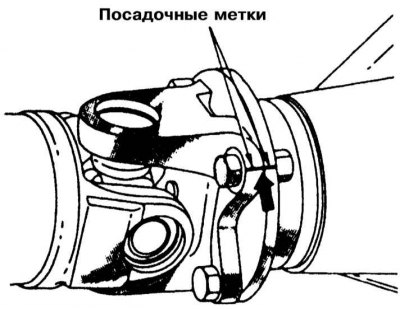
4. Mark the position of the mounting flange of the rear driveshaft clamp on the connecting flange of the rear axle differential. Turn out fixing bolts and separate a shaft from differential, - try not to damage a protective cover.
Note. To protect the cover from damage, you can push rags or crumpled paper into it.
5. When removing the propeller shaft from the transfer case housing, take care to keep the oil seal intact and intact.
6. To avoid leakage of oil from the transfer case, do not lower the rear of the vehicle to the ground. It makes sense to clog the hole in the crankcase in order to prevent dirt from getting inside the box.
Installation
1. Move the driveshaft to its original position and thread it into the transfer case housing (try not to damage the seal).
2. Having followed the correct alignment of the landing marks applied during dismantling, connect the shaft to the rear differential flange. Screw in the mounting bolts and tighten them with the required force (30÷35 Nm).
3. Install the center support bearing (see Section Removal and installation of the assembly of the central bearing of the cardan shaft), - follow the correct installation of all fasteners of the assembly. Screw on the fixing nuts and tighten them to the required torque (30÷35 Nm).
4. Check fluid levels in transfer case and rear differential housing.
