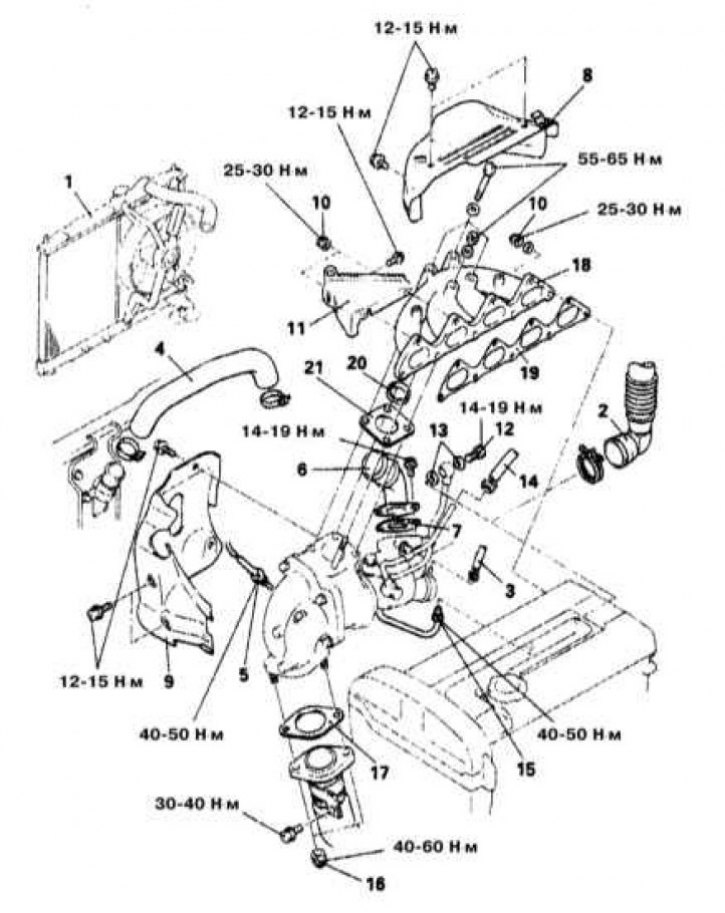
Details of the turbocharger assembly installation on Galant models 1990÷1993. ed., equipped with a 2.0 l DOHC engine (1 of 2)
1 - Radiator; 2 - Branch pipe for connecting the air supply hose; 3 - Vacuum hose connection fitting; 4 - Air hose connection A; 5 - Oxygen sensor; 6 - Air outlet pipe; 7 - Sealing gasket; 8 - Thermal screen A; 9 - Thermal screen B; 10 - Self-locking nut; 11 - Lifting eye of the power unit; 12 - Hollow bolt of choke connection; 13 - Sealing gasket; 14 - Branch pipe for connecting a water hose; 15 - Branch pipe for connecting the water pipe B; 16 - Self-locking nut; 17 - Sealing gasket; 18 - Exhaust manifold; 19 - Sealing gasket; 20 - Ring; 21 - Sealing gasket

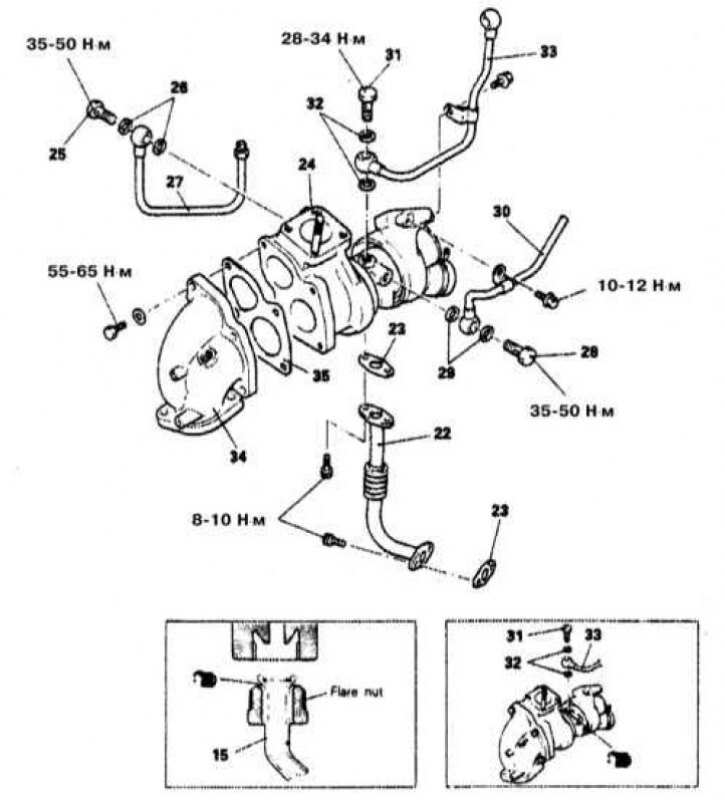
Details of the turbocharger assembly installation on Galant models 1990÷1993. ed., equipped with a 2.0 l DOHC engine (2 of 2)
22 - Oil return pipe; 23 - Sealing gasket; 24 - Turbocharger; 25 - Hollow bolt of choke connection; 26 - Sealing gasket; 27 - Water tube B; 28 - Hollow bolt of choke connection; 29 - Sealing gasket; 30 - Water tube A; 31 - Hollow bolt of choke connection; 32 - Sealing gasket; 33 - Oil pipeline; 34 - Outlet pipe; 35 - Sealing gasket
2.0L DOHC engines (only Galant 1990÷1993 issue)
General information
Most turbocharger failures are related to oil supply problems. Leaks when turning off the engine can lead to impellent oil entering the turbocharger and coking oil flows - always check the patency of the oil supply and return lines first. When connecting the oil path lines, be sure to replace both sealing washers of the hollow bolts of the union connections.
Removing
1. The turbocharger installation details are shown in the illustrations.
2. Disconnect the negative cable from the battery.
If the stereo system installed in the car is equipped with a security code, before disconnecting the battery, make sure that you have the correct combination to activate the audio system!
3. Drain the engine oil, drain the cooling system and remove the radiator. On models equipped with A/C, remove the fan of the air conditioning system as an assembly with a radiator.
To avoid burns, proceed with the above work only after the system has completely cooled down! Do not allow antifreeze to come into contact with exposed areas of the body and painted surfaces of the car. Accidental splashes should be washed off immediately with plenty of water. Remember that antifreeze is a highly toxic liquid and getting it into the body, even in small quantities, is fraught with the most serious consequences (up to death). Never leave antifreeze stored in a loosely sealed container and clean up spilled coolant on the floor without delay. Remember that the sweet smell of antifreeze can attract the attention of children and animals. Consult any car service station about ways to dispose of used coolant. In many regions of the world, special points have been set up to receive various types of detention. Never drain old coolant down the drain and onto the ground!
4. Disconnect the electrical wiring and remove the oxygen sensor.
5. Remove the engine oil dipstick, remove its guide tube.
6. Remove corrugated air intake hose, vacuum release hose, air outlet hose connections, and top and bottom heat shields.
7. Unbolt the steering pump and slide it to the side assembly with the support bracket without disconnecting the hydraulic hoses.
8. Give the self-locking nuts of the exhaust manifold, remove the triangular lifting eye of the power unit, unscrew the hollow bolt of the union connection of the oil supply line to the central section of the turbocharger (don't forget to remove both sealing washers), also disconnect the lines of the cooling path.
The water path line passing under the turbocharger assembly is equipped with a threaded fitting.
9. Give fixing nuts, disconnect a reception pipe of system of release of the fulfilled gases and separate an exhaust manifold and its sealing lining from the engine.
10. Turn out two through bolts and give two nuts of fastening of an exhaust manifold to turbocharger assembly.
11. Remove two cap screws from the return oil flow passed under the turbocharger assembly, remove the sealing gasket. Separate the turbocharger from the exhaust manifold (two water pipes and one oil line can be left connected).
12. Carefully inspect the turbine wheels (hot assembly section) and compressor (cold section) for cracks and other mechanical damage. Manually check the free rotation of both wheels. Check for signs of oil leaks. Check the ability of the bleed valve to remain open. Replace defective components, if necessary, clean the oil passages.
13. The health of the reset device can be checked by pressure testing. Pressurize the actuator to approximately 62 kPa and check that the stem can move.
Applying a pressure of more than 71 kPa may damage the diaphragm! When creating a vacuum on the actuator, the latter must be securely held - in case of leaks, replace the assembly.
Do not attempt to adjust the release valve!
Installation
1. Fill the oil return line with clean engine oil. Replace all locknuts. Before installing the threaded connection of the water inlet tube, lightly lubricate the inside surface of the connecting flange with liquid oil. Install the turbocharger to the exhaust manifold.
2. Install the exhaust manifold assembly in its proper place (don't forget to replace the gasket).
3. Connect the lines of the cooling path, the oil supply line and the lifting eye of the power unit.
4. If removed, reinstall the steering pump assembly with its support bracket.
5. Install heat shields, air outlet, drain hose, and corrugated air ducts.
6. Install the heatsink assembly.
7. Fill the engine with fresh engine oil, fill the cooling system and connect the negative cable to the battery.
