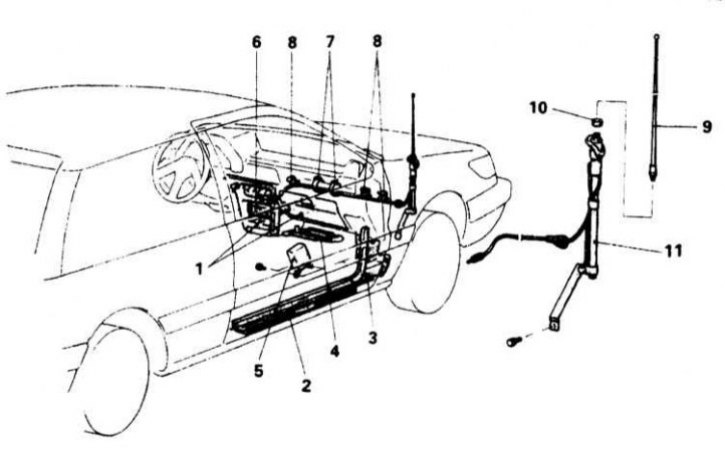
Radio antenna installation details on Mirage models through 1992 vol.
1 - The central section of the instrument panel trim and glove box; 2 - Threshold; 3 - Overlay side fairing; 4 - Air sleeve (models with rear heater); 5 - MPI control module; 6 - Radio receiver; 7 - Cable ties; 8 - Clamps; 9 - Antenna mast; 10 - Antenna base mounting nut; 11 - Antenna base

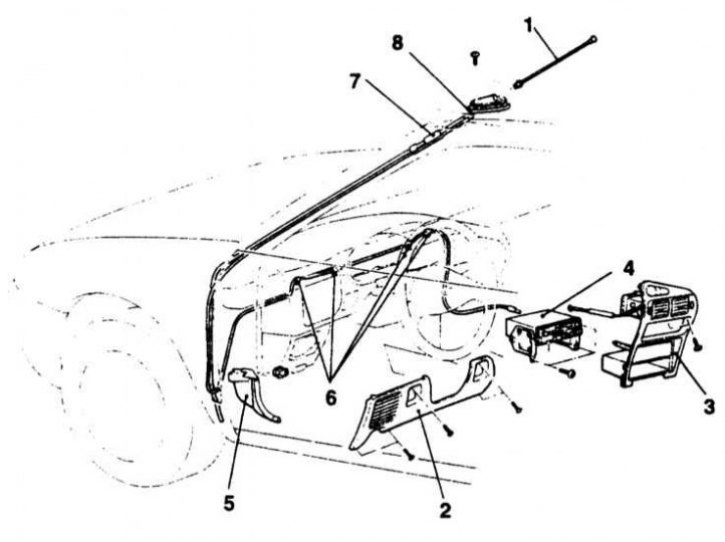
Radio antenna installation details on Mirage models since 1993 vol.
1 - Antenna mast; 2 - Knee support; 3 - Central section of the instrument panel trim; 4 - radio; 5 - Overlay side fairing; 6 - Retainer; 7 - Antenna cable; 8 - Antenna base

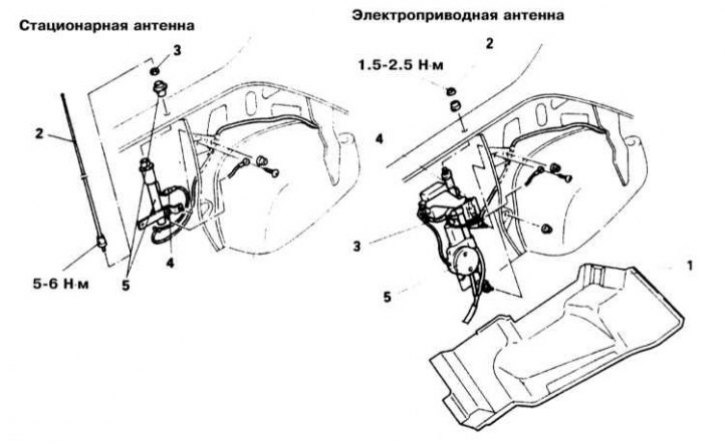
Radio antenna installation details on Galant models
Fixed antenna: 1 - Panel side upholstery luggage compartment; 2 - Antenna mast; 3 - Ring nut; 4 - Antenna cable connector
Electric drive antenna: 1 - Panel side upholstery luggage compartment; 2 - Ring nut; 3 - Wiring connector; 4 - Antenna cable connector; 5 - Drive motor

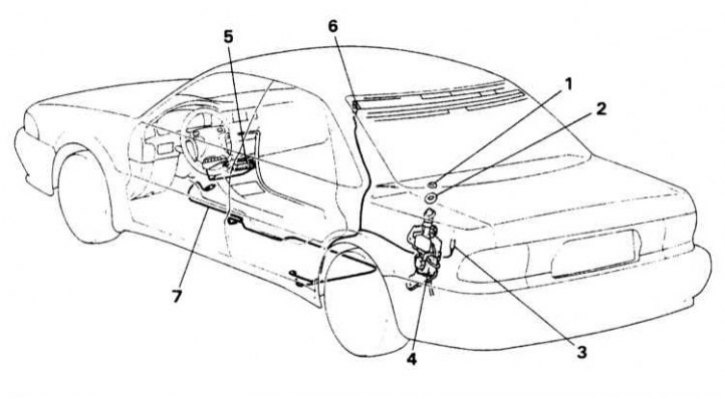
Radio Antenna Installation Details on Diamante Models
1 - Ring nut; 2 - Antenna base; 3 - Contact connector for electrical wiring and antenna cable; 4 - Assembling the drive motor; 5 - radio; 6 - Glass antenna with antenna cable connector; 7 - Antenna cable
Note. The antenna mast can be replaced by simply unscrewing it from the base. The procedure for replacing the base assembly with antenna cable is described below.
Mirage models through 1992 no.
Removing
1. Radio antenna installation details on Mirage models up to 1992 vol. shown in the illustration.
2. Jack up the car and put it on stands.
3. Remove the right front wheel.
4. Remove the wheel arch protection locker.
5. For the purpose of ensuring access to a radio receiver remove the central section of furnish of the panel of devices and a ware box.
6. Remove overlays of a threshold of the right forward door of the car.
7. On models with a back heater remove the air duct laid under a ware box.
8. Carefully remove the PCM (see chapter Engine management systems).
9. Remove the radio and disconnect the antenna cable from it.
10. Release the cable from the intermediate strappings and latches securing it under the instrument panel.
11. Unscrew the antenna mast from its base assembly.
12. Loosen the top nut of the antenna base (on the roof of a car) and loosen the lower mast bolt.
13. Remove the mast and carefully release the antenna cable.
Installation
1. Insert the replacement antenna assembly into the hole in the wing and securely tighten the top nut and bottom bolt.
2. Carefully insert the cable under the instrument panel and connect it to the radio receiver, - make sure that the cable is securely fastened in all the provided clamps and strappings.
3. Replace the MPI control module.
4. If removed, reinstall the heater air sleeve.
5. Establish overlays of a threshold of the right forward door.
6. Install the storage box.
7. Establish the central section of finishing of the panel of devices.
8. Install the wheel arch protection locker.
9. Install the wheel and lower the vehicle to the ground.
Mirage models since 1993 issue.
Removing
1. Radio antenna installation details on Mirage models since 1993 vol. shown in the illustration.
2. Disconnect the negative cable from the battery.
Attention! If the stereo system installed in the car is equipped with a security code, before disconnecting the battery, make sure that you have the correct combination to activate the audio system!
3. Remove the antenna base screws.
4. Raise the antenna mast/base assembly and separate it from the roof of the vehicle.
5. Disconnect the antenna cable.
Installation
Installation is in the reverse order.
Models Galant and Diamante
Removing
1. The radio antenna installation details on Galant and Diamante models are shown in the illustrations.
2. Disconnect the negative cable from the battery.
Attention! If the stereo system installed in the car is equipped with a security code, before disconnecting the battery, make sure that you have the correct combination to activate the audio system!
3. Remove the side panel of an upholstery of a luggage space.
4. On models with a fixed antenna, unscrew the mast.
5. Carefully loosen the ring nut on top of the fender.
6. Disconnect the electrical wiring from the drive motor. Disconnect the antenna cable.
7. Give fixing bolts and nuts and remove assemblage of the electric motor of a drive of the antenna.
Installation
1. Install the drive motor and tighten its fasteners.
2. Restore the original wiring and antenna cable connections.
3. Screw on the ring nut and carefully tighten it to the required torque (4 Nm, - slightly stronger than by hand).
4. On fixed antenna models, screw in the mast.
5. Establish the side panel of an upholstery of a luggage space.
