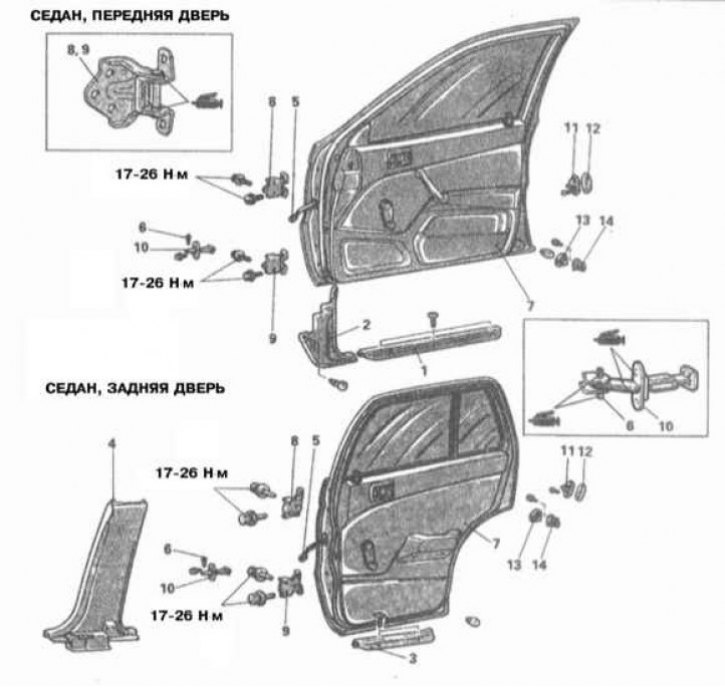
Installation details for side doors on Mirage models up to 1992 vol.
1 - Threshold; 2 - Side fairing; 3 - Threshold; 4 - Decorative overlay of a door rack; 5 - Contact connector for electrical wiring; 6 - Spring-loaded pin; 7 - Door assembly; 8 - Upper loop; 9 - Lower loop; 10 - Door opening limiter; 11 - Drummer; 12 - Adjusting lining of the drummer; 13 - Cap of the sensor-switch of the door; 14 - Sensor-switch door

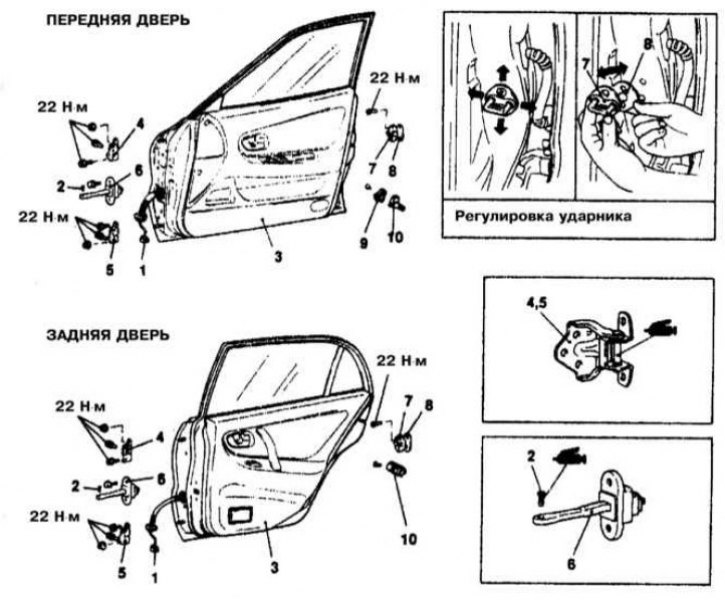
Installation details of side doors on Galant models 1994÷1998. issue
1 - Contact connector for electrical wiring; 2 - Spring-loaded pin; 3 - Door assembly; 4 - Upper loop; 5 - Lower loop; 6 - Door opening limiter; 7 - Drummer; 8 - Adjusting lining of the drummer; 9 - Cap of the sensor-switch of the door; 10 - Sensor-switch door

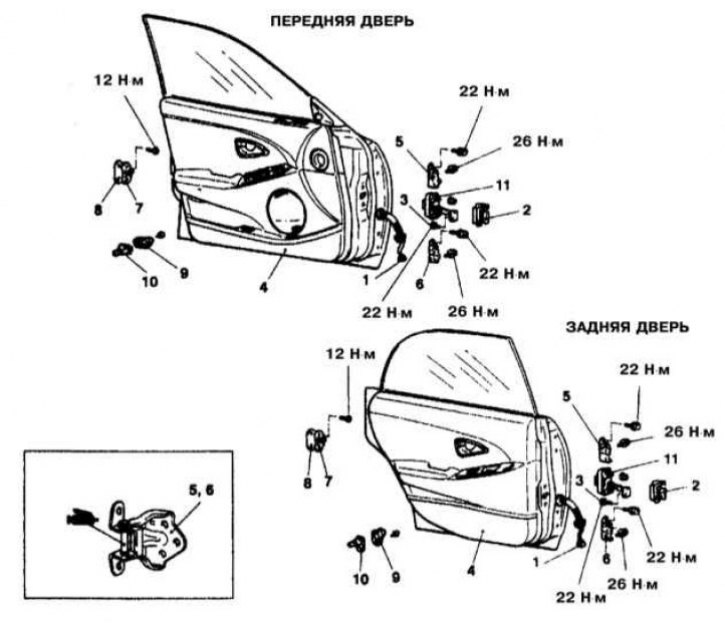
Installation details for side doors on Diamante models since 1997 vol.
1 - Contact connector for electrical wiring; 2 - Door opening limiter cover; 3 - Bolt; 4 - Door assembly; 5 - Upper loop; 6 - Lower loop; 7 - Door opening limiter; 8 - Drummer; 9 - Adjusting lining of the drummer; 10 - Cap of the sensor-switch of the door; 11 - Sensor-switch door
Note. The procedure is identical for both the front and rear side doors of the vehicle.
Removing
1. Details of installation of door assemblies are shown in the illustrations.
2. Disconnect the negative cable from the battery.
Attention! If the stereo system installed in the car is equipped with a security code, before disconnecting the battery, make sure that you have the correct combination to activate the audio system!
3. Open the door and support it with a trolley jack - to protect the paintwork, place a piece of wood between the jack head and the edge of the door.
4. Turn out bolts of fastening of the limiter of opening of a door.
5. Loosen the threaded bushing and disconnect the door main cable harness. Disconnect the other door assembly connectors.
6. Mark the position of the door hinge strips.
7. Unscrew the hinge bolts and carefully remove the door assembly - use the help of an assistant.
Installation
1. With the help of an assistant, install the door in its regular place, support it with a jack and tighten the bolts of the hinge bars by hand.
2. Align the hinge strips in accordance with the landing marks made during dismantling, then tighten the fixing bolts to the required torque (17÷26 Nm: for Galant models up to 1993 vol. and Mirage up to 1992 vol., 22 Nm: for Diamante, Galant models since 1994 vol. and Mirage 1993÷1999 issue and 27 Nm: for Mirage models since 1997 vol.).
3. Restore the original wiring connection.
4. Install the door opening limiter and firmly tighten the bolts of its fastening.
5. Remove the jack supporting the door.
6. Connect the negative cable to the battery.
Adjustment
1. Determine which of the hinge strip bolts must be loosened to move the door in the required direction.
2. Loosen the bolts, allowing the door assembly to move freely.
3. Correct a door in a body aperture and again tighten fixing bolts with the demanded effort.
4. Continue the procedure until the door is in the desired position in the body opening.
5. Check up serviceability of operation of a latch of the lock of a door.
6. If necessary, loosen the striker plate mounting bolts and by rotating the latter, achieve proper latch operation.
7. Tighten the fixing bolts to the required torque (12 Nm).
